The Forged Curse Compendium
List of items, enemies you may encounter, and guides for The Forged Curse
Jump to items · Jump to Enemies · Jump to Guides · Jump to Archipelago
Items

Hourglass
Use to rest, allowing for time to pass without an action. You can heal over time by resting continuously.

Cheese
Eat to heal 20 points and increase rate of healing when resting for a while. Found in both chests and loot drops.

Keys


Color coded keys that open doors of matching color.

Crowbar
Opens barricaded doorways. Does not destroy barrels.

Grappling Hook
Hooks onto wooden objects and pulls you to them. Can pull you over spikes and water!

Push Rod
A magic rod that pushes heavy rocks.

Anvil
Part of the forge. Place the anvil on its pedestal. 

Hammer
Use on anvil after the forge's flame is rekindled to craft bolts.

Bellows
Pushes enemies away. Use to rekindle the forge flame.

Magic Crossbow
Shoot enemies and cursed barriers at range. Requires silver bolts.
Silver Bolts
Fire from crossbow. Craft at the forge once reconstructed.

cricket
Stuns enemies and weakens cursed barriers nearby. Long cooldown. It's the "secret ingredient"!

Bombs
Blow up cracked walls and barricaded doorways. Damages enemies (and you! watch out).

Blink Rod
Teleport over two spaces in any cardinal direction. Be careful not to blink into a wall! Ouch!

heart gem
Permanently increases your maximum health points by 10. There are at least five to find.

sword


Equip to increase attack power. wooden -> iron -> gold

armor


Equip to increase defense points. leather -> iron -> gold

silver bullion
Required to forge silver arrows and place bombs. Found in both chests and loot drops.
Enemies

Cave Spider
Regular cave spider. Watch out for it's web attack, it'll really slow you down!

Snake
Green snake, will attack and has a chance to poison on hit.

Bat
Bats will awaken and attack if you make too much noise. Try resting between steps to sneak up on them.
 <- Sleeping bat

Kikku
Kikku is just a li'l guy. And watch out, Kikku kick you.

Amanita
Red, spotted mushroom that releases spores which cause mild confusion, mixing up your controls. Try to rest to remove effect faster.

Browncap
Brown mushroom that releases slow spores which cause the slow effect, reducing your speed. This allows enemies to take multiple turns before your next. Rest to remove effect faster.

Lionsmane
Large mushroom that releases weakess spores which cause the weak effect, decreasing your attack power. Rest to remove effect faster.

Gnoglic
Strange mushroom that releases poison spores which do damage every turn. As soon its safe, rest to remove effect faster and take less damage.

Pigcube
Looks like the PIGsquad mascot. How could we not include them for the game jam? Did you just kill cubepig!?

Shadow
It's a spooky shadow monster! Shadows are light sleepers but they're hard to spot until they wake up.
 <- Sleeping shadow

Monstera
Will attack if you destroy its home. Why would you do that?

Snail
High defense, probably need a weapon of some kind to overcome the shell.

Banana Slug
How did a banana slug end up in a cave? It's slime sometimes has a strange effect.

Battle Crab
Large claw and tough shell makes for a dangerous foe. They're fast too!

Axolotl
Its jet spray can hit you from far away. What incredible aim!

Shrimp
A meager shrimp. Just attacks, nothing more.

Slime


Does the classic slime thing of splitting into smaller slimes.

Corrupted Kobold
There's something wrong with these kobolds, like they're corrupted by an unknown power. Perhaps there is a cure...

Eyebat
Like the regular bats but somehow tougher.
 <- Sleeping Eyebat

Reecher
Its hand can attack at a distance but its home is fragile. Packs a punch!

Mimic
Beware of chests. One could be a mimic and you don't want to deal with that.

Potmimic
Beware of pots as well. One could be a pot mimic and you don't want to deal with that either.

Dragon Skull
The indestructable skull of a dragon whelp, cruelly reanimated to endlessly breathe fireballs on unwanted guests.

Li'l Wiz
They may be little but they've got big eyebrows.
Maps and Guides
Play strategically
Just Ramming your face into every enemy is a sure way to die often. It's on a tick system so you can plan out your actions. Look for opportunities to retreat, hide, and rest when your health gets low.
Vanilla version
While The Forged Curse was designed with Archipelago in mind, it was also made to stand alone as a classic adventure! Playing the vanilla version of the game will help you learn for randomizer.
Pebbles + Bombs
Pebbles prevent pushable objects from moving. You can use bombs to destroy pebbles. Sometimes pebbles have been placed to prevent soft lock; be careful with the push rod.
Line of Sight
Enemies wander but only give chase when they can see you.
Equipping
Weapons and armor do not automatically equip when received. Don't forget to equip them!
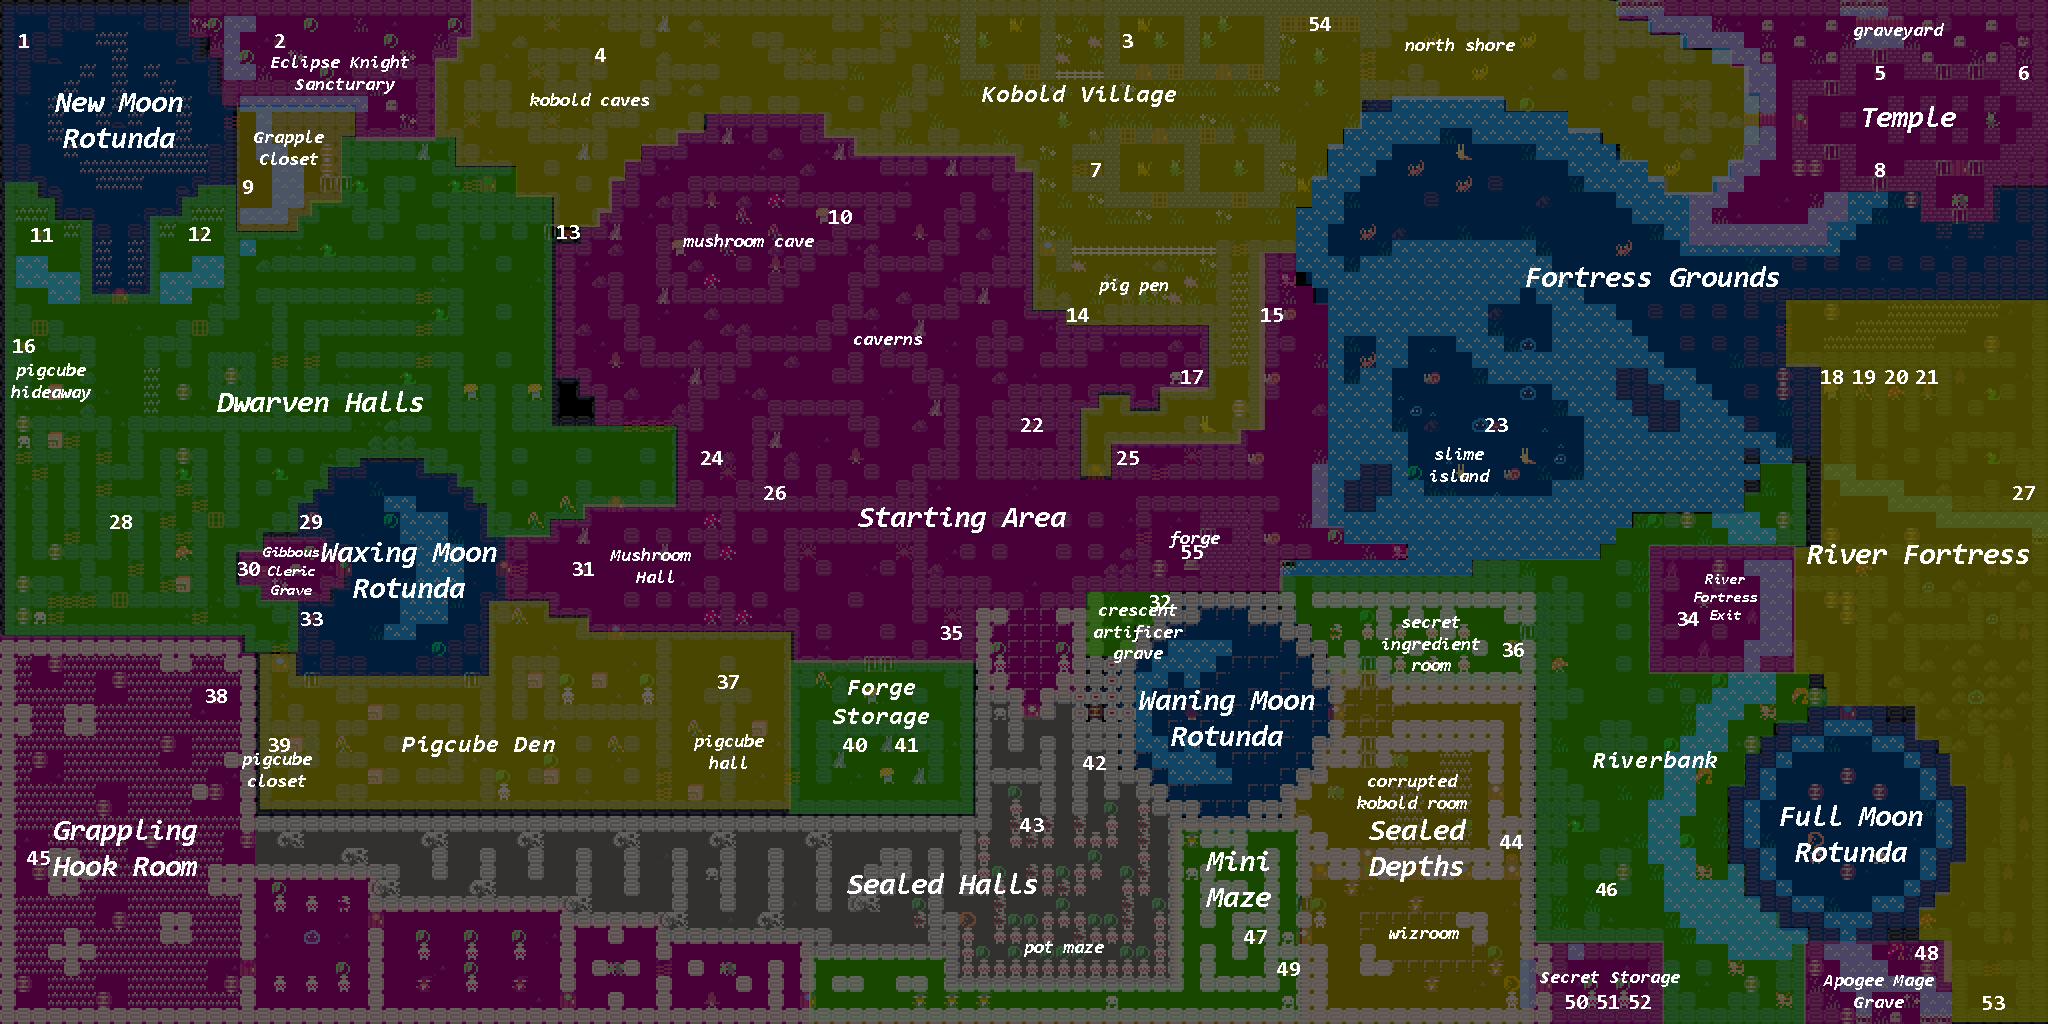
Vanilla Map
- Blink Chest: Blink Heart Gem
- Eclipse Knight Sanctuary Chest: White Key
- Kobold Home Chest: Kobold's Loot
- Kobold Cave North Chest: Hammer
- Temple North Chest: Blue Key
- Unknown Priest Grave: Skeleton Key
- Shed Chest: Green Key
- Temple South Chest: Crossbow
- Grappling Hook Chest: Grappling Hook
- Mushroom Cave Chest: Blink Rod
- NMR Left Chest: loot
- NMR Right Chest: loot
- Kobold Cave South Chest: loot
- Pig Pen Chest: loot
- Riverside Chest: Riverside Heart Gem
- Pigcube Hideaway Chest: loot
- Kikku Chest: Crowbar
- Fortress Lionsmane Chest: loot
- Fortress Gnoglic Chest: loot
- Forgress Amanita Chest: loot
- Fortress Browncap Chest: loot
- Gold Armor Chest: Gold Armor
- Slime Island Chest: Gold Sword
- Wooden Sword Chest: Wooden Sword
- Spider Storage Chest: loot
- Leather Armor Chest: Leather Armor
- Fortress Blocked Chest: loot
- Orange Key Chest: Orange Key
- Waxing Moon Mimic: loot
- Gibbous Cleric Gave Chest: Bellows
- Red Key Chest: Red Key
- Victory Chest: You did it!
- Waxing Moon Chest: push rod
- Fortress Exit Chest: loot
- Anvil Chest: Anvil
- Secret ingredient Mimic: Cricket
- Pigcube Hall Chest: loot
- GHR North Chest: loot
- Pigcube Closet Chest: Pigcube Heart Gem
- Iron Armor Chest: Iron Armor
- Iron Sword Chest: Iron Sword
- Pot Maze Right Chest: Bombs
- Pot Maze Left Chest: loot
- Monty Hall Door Chest: loot
- GHR Center Chest: loot
- Lower Riverbank Chest: loot
- Mini Maze Center: loot
- Apogee Mage Grave Chest: Boat
- Mini Maze Right Chest: loot
- Secret Storage Left Chest: loot
- Secret Storage Center Chest: Storage Heart Gem
- Secret Storage Right Chest: loot
- Fortress Closet Chest: Fortress Closet Heart Gem
- Map Check: Map
- Forge Check: Silver Bolts
NMR: New Moon Rotunda
GHR: Grappling Hook Room
Vanilla Guide
A succinct guide to help you through the vanilla game. This is not an optimized route and will not go over every chest or explain puzzles; it's just an outline of one possible path.
Part 1: New Moon Rotunda
- Open chests 17, 24, and 26 in the caverns to get the crowbar, wooden sword, and leather armor.
- Equip your new weapon and armor, and venture east to chest 15 to get the Heart Gem.
- Pick up the anvil in chest 35, then continue to the mushroom hall and get the Red Key in chest 31.
- From the red door, go through the crowbar maze in the Dwarven Halls to get the orange key in chest 28.
- Brave the shadows in the New Moon Rotunda and claim the grappling hook in chest 9.
Part 2: Waxing Moon Rotunda
- Head back to the mushroom hall and go through the orange key door into the Waxing Moon Rotunda. Get the push rod from chest 33.
- Go to the Kobold Village from the orange door in the starting area.
- Get the map from check 54 and the green key from chest 7 then follow the north shore to the Temple.
- From the Temple, get the blue key from chest 5 and the crossbow from chest 8. The Kobold priest hints at how to get into the sealed halls.
- Get the hammer from chest 4 in the kobold caves then return to the Waxing Moon Rotunda and get the bellows from chest 30.
Part 3: Full Moon Rotunda
- Enter the Pigcube Den from the blue door in the mushroom hall or the one near the crowbar maze in the Dwarven Halls.
- Make your way to Forge Storage and get weapon and armor upgrades in chests 40 and 41. If you missed chest 35, open it for the anvil on your way out.
- Head to the Forge and forge the silver bolts from check 55 using the anvil, bellows, and hammer.
- Make your way back through the Kobold Village to the temple. Outside the Temple, on the little outcropping where the streams come together, grappling hook to the barrel on the south side. Navigate the Fortress Grounds to find and enter the River Fortress.
- Be sure to grab chest 53 in the southeastern corner of the River Fortress for another Heart Gem.
- Defeat the boss in the Full Moon Rotunda and get the boat from chest 48 in the Apogee Mage Grave.
Part 4: Waning Moon Rotunda
- Exit the River Fortress, stop by slime island, and equip the gold sword from chest 23.
- Boat to the secret ingredient room and get the albino cricket from chest 36.
- Retrieve the white key from chest 2 in the Eclipse Knight Sanctuary, then head back to the Starting Area.
- Use the hints from the Kobold Priest to destroy the barrier and enter the Sealed Halls (You will need the silver bolts and the cricket).
- Get chest 42 from the pot maze in the Sealed Halls.
- optional: From here, there's some useful items you can find. Chest 22 for gold armor, then 10 in the mushroom cave for the blink rod, and finally 39 and 1 to get two more heart gems.
- Make your way through the Sealed halls, Grappling Hook Room, and Sealed Depths. If you want another Heart Gem, go to the Secret Storage and open chest 51.
- Defeat the Big Wiz in the Waning Moon Rotunda to access the crescent artificer grave. Open chest 32 to complete your victory and claim your prize; don't forget to use it!
Archipelago / Randomizer
Generate a single player or multiplayer randomizer using Archipelago.gg!
Archipelago is a multi-game randomizer system that randomizes different games together into a single cooperative experience between each of the games. Items from one game may be located in another so work alongside others to complete everyone's randomized games.
Written step by step How To Play Archipelago / Randomizer for The Forged Curse are available here
Game Options
You can change your Archipelago experience by modifying the YAML manually. You can learn more about YAML for Archipelago here.
Barrier Skip
Adds logic to use the Blink Rod or Grappling Hook and the White Key to access the Sealed Halls.
Damage Boosting
Adds logic for tanking snails at the beginning of the game and tanking spikes (often in conjunction with the Blink Rod) to get to areas normally requiring other items.
Deathlink
When someone else dies, so do you. When you die, everyone with deathlink enabled dies.
Currently in development.
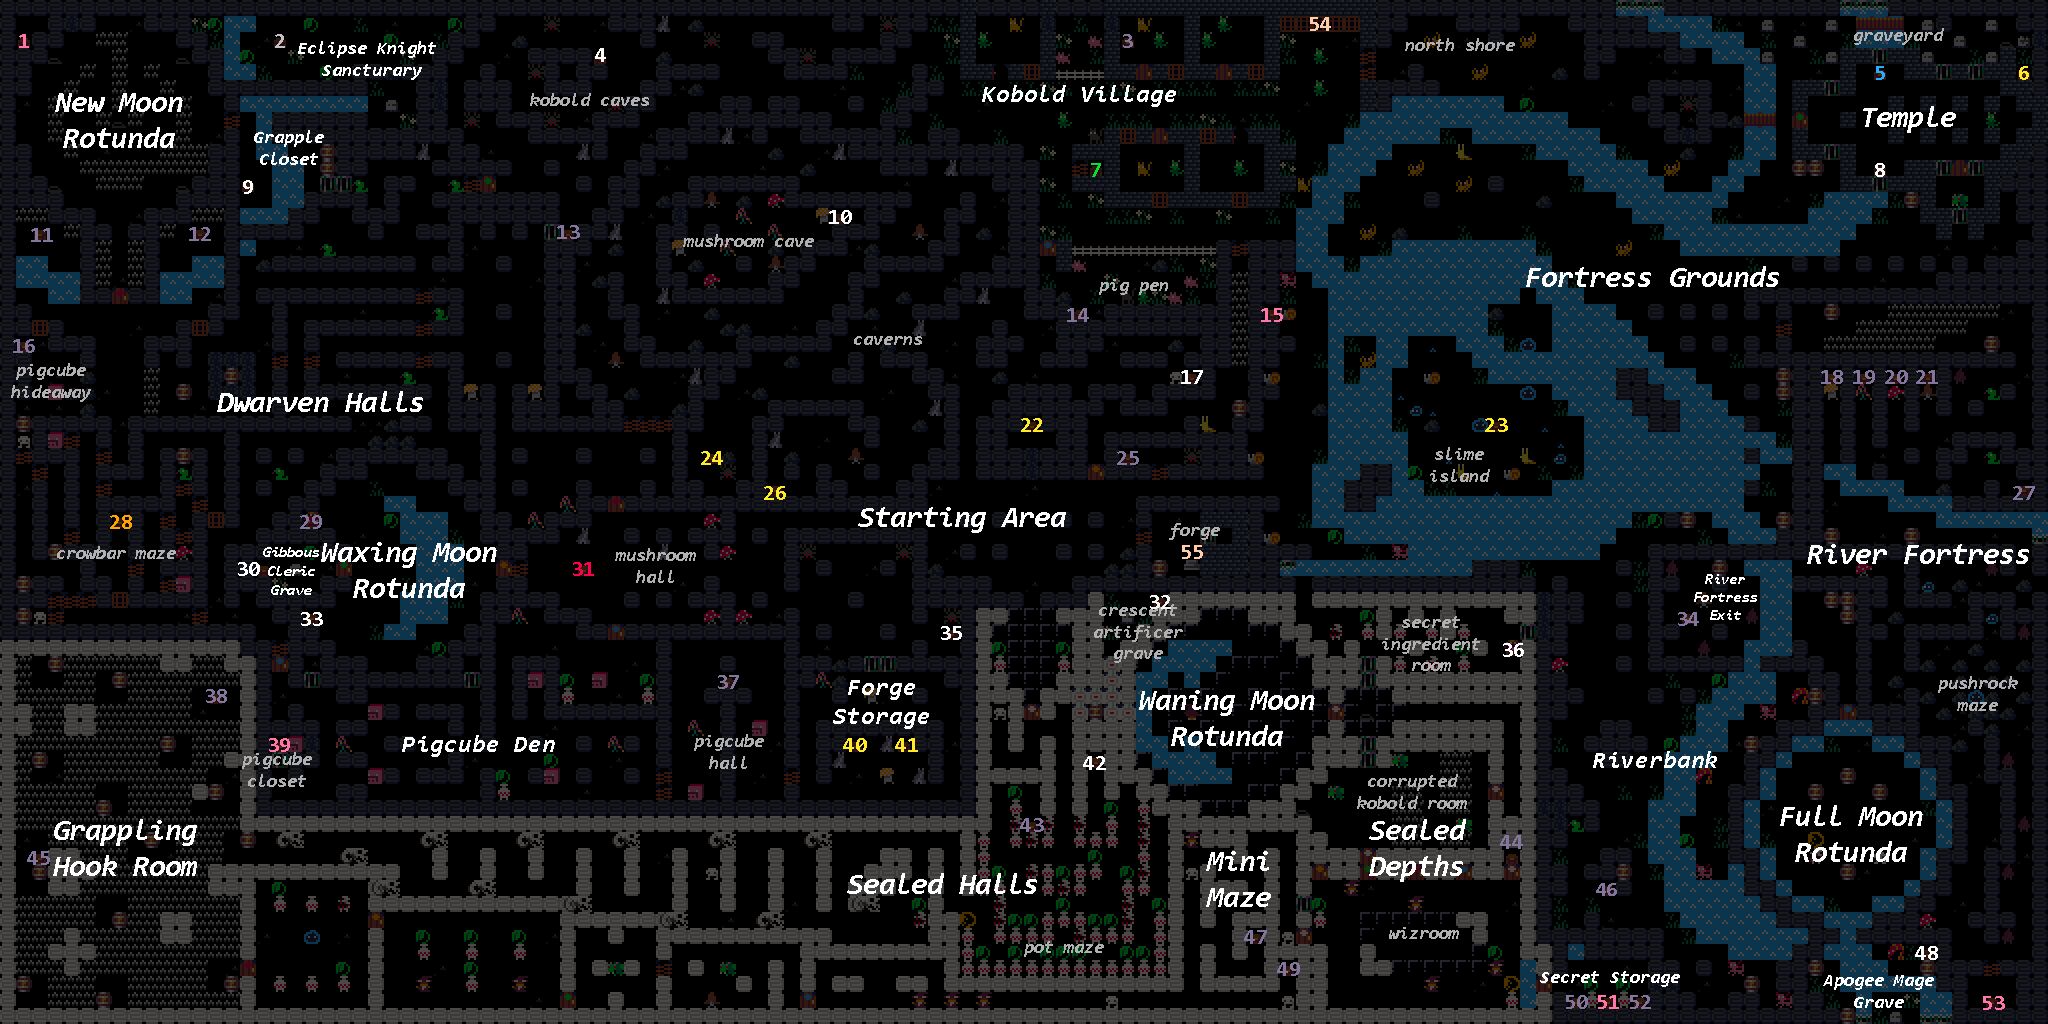
Regions Map